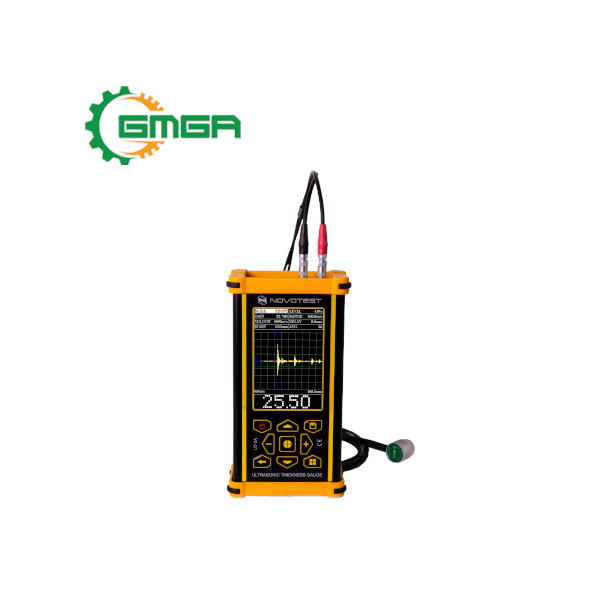
Thickness gauge A-Scan NOVOTEST UT-2A
Price: Contact
| Model | UT-2A |
| Manufacturer | NOVOTEST |
| Power supply | Built-in Li-ion Battery |
| Weight | 0.5 Kg |
| Size | 165 x 90 x 50 mm |
| Condition | Stocking |
| Warranty | 12 months |
Thickness gauge A-Scan NOVOTEST UT-2A is a portable, lightweight and robust thickness gauge, built in a handy impact resistant case with rubber guards - a current industry version great of universal thickness gauge.
I. Specification of ultrasonic thickness gauge NOVOTEST UT-2A
NOVOTEST UT-2A - High measurement accuracy:
- The UT-2A non-invasive thickness gauge has achieved the maximum measurement accuracy from ever produced ultrasonic thickness gauges.
- The A-Scan measurement method does not depend on the strength of the signal which is different from the edge method. Due to the adoption of high-performance computational FPGA chip, NOVOTEST UT-2A enables high resolution of thickness, while maintaining operating speed and signal stability.

NOVOTEST UT-2A - Easy to use interface:
- The NOVOTEST UT-2A ultrasonic thickness gauge is suitable even for inexperienced users using the digital measuring mode, just like in the original devices.
- Digital values of thickness are displayed in large font on the screen and do not need to be adjusted by A-scan. So it is simply and conveniently the same as the classic UT-1M ultrasonic thickness gauge.

Thickness gauge A-Scan NOVOTEST UT-2A has useful operating modes and is convenient to use:
- Control mode. User can set nominal thickness and allowable deviation through nominal value. During testing this NOVOTEST UT-2A ultrasonic thickness gauge will indicate if the measured value deviates above the limit (via lights or sounds). That simplifies testing and reduces the possibility of errors.
- Product profile display mode (B-Scan). On the screen UT-2A will show the product profile by the probe scanning surface. That mode makes it possible for the user to visualize the profile (section) of the inspected object. This mode can be used when it is necessary to present a report with an illustration of the subject's flaws.


NOVOTEST UT-2A - Implement special thickness measurement modes:
- ECHO
- ECHO with regulator port (measurement site)
- ECHO-ECHO (DUAL ECHO) - commonly used when measuring thickness through coatings. This method allows the NOVOTEST UT-2A to measure the thickness of the metal under the coating without polishing.
- PEAK-PEAK - the method is similar to ECHO-ECHO with the difference that the triggering moment is calculated not by crossing zero, but by the maximum level of the signals in the gate.
- The use of a large number of measurement methods allows flexible use of the NOVOTEST UT-2A ultrasonic thickness gauge, depending on the specific job.

NOVOTEST UT-2A - Comparison with classic thickness gauges:
- Unlike conventional thickness gauges, which display only one thickness value, the thickness gauge A-Scan NOVOTEST UT-2A allows operational visualization of the signal for subsequent analysis.
- As a rule, the function of A-scan is necessary for professional users but even for beginners, it will be a useful function. Making the viewing at the screen visually display the reflected signals, it can eliminate false triggering, adjust the thickness gauge as precisely and precisely as possible.
- By working with a signal can not only greatly increase the accuracy of thickness measurement and in that case to perform product defect detection, in essence ultrasonic thickness gauge A- Scan NOVOTEST UT-2A can solve the main tasks of an ultrasonic flaw detector.

II. Advantages of the ultrasonic thickness gauge A-Scan NOVOTEST UT-2A
- Multiple gauge thickness
- NOVOTEST UT-2A combines the functions of a thickness gauge and a flaw detector
- Convenient and easy to operate
- Scan mode B, allows users to get product profile like an easy to read picture
- Minimum number of controls
- Select probe type from the archive
- Supersonic speed preset
- High-brightness color screen
- Indicates the presence of sound contact.
***You may be interested in the GMGA Ultrasonic Coating Thickness Gauge: https://gmga.vn/en/danh-muc/measuring-device/thickness-measuring-equipment/ultrasonic-coating-thickness-gauge/
III. Specifications of thickness gauge A-Scan NOVOTEST UT-2A
|
Measuring thicknesses range for steel, mm |
0.4 – 1000 |
| Unit Type |
mm |
|
Resolution, mm |
0,01 |
| Ultrasound velocity adjustment range, m/s |
700-17000 |
|
Ultrasound velocity in the standard device sample, m/s |
6070 ± 70 |
| Operating modes |
A-scan |
|
B-scan |
|
|
Digital mode |
|
|
Control mode |
|
|
Manual |
|
|
Measurement methods |
Echo |
|
Echo Echo (Dual Echo) |
|
|
Peak-peak |
|
| Display |
Colour, 3.5 inch 480 * 320 |
|
Menu Language |
English, Russian |
| Weight of the electronic unit, not more, kg |
0.5 |
|
Dimensions (L x W x H) |
165x90x50mm |
| Power Supply |
Built-in Li-ion Battery |
|
Time of continuous work, not less than, h |
10 ( up to 20 by special order ) |
| Operating temperature range for the electronic unit, ° C |
-20 to +40 |
|
Air moisture, no more |
98 %, at 35 °С |
IV. NOVOTEST UT-2A standard kit
- Ultrasonic Thickness Gauge A-Scan NOVOTEST UT-2A
- Probe
- Lemo-Lemo able
- Calibration block
- Cable for PC
- Charger
- Operating manual
- Shipping Box.

***Video of ultrasonic material thickness gauge at: Gmga Measuring Youtube.
No comments yet
SIGN UP FOR A CONSULTATION
Please fill in the form below and send your comments and questions to GMGA, we will respond to your email as soon as possible.

COMMIT
100% new product

COMMIT
100% refund if the product is of bad quality and not as promised

DELIVERY
Nationwide






Review Thickness gauge A-Scan NOVOTEST UT-2A
There are no reviews yet.